
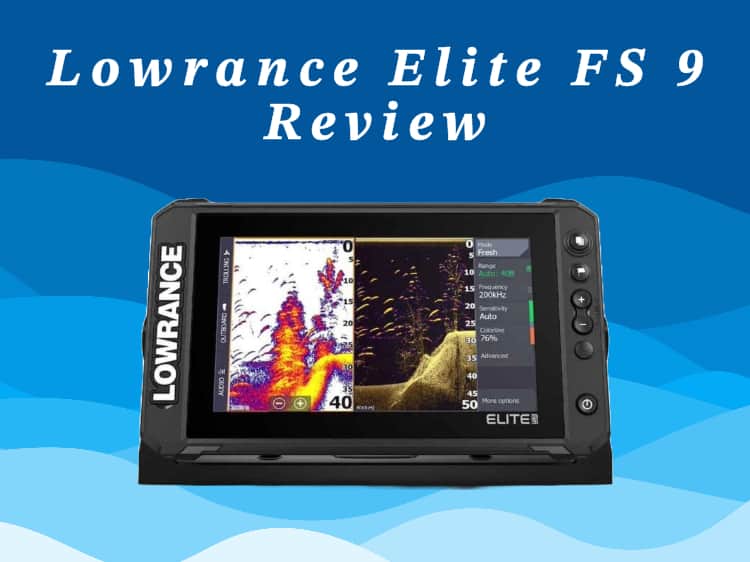
The Lowrance’s Elite FS 9 is a premium fish finder and chartplotter combo that offers an array of high-end functionalities. It has a 9-inch high-resolution touchscreen that provides clear visuals and easy navigation through menus and features.
This fish finder comes with the Active Imaging 3-in-1 transducer that offers CHIRP, SideScan, and DownScan sonar. It allows anglers to get detailed views of fish, structure, and cover below and to the sides of the boat. It is also compatible with Active Target live sonar which provides real-time views of the underwater environment.
The built-in GPS and preloaded C-MAP Contour+ charts enhance navigation by offering detailed mapping of inland and coastal waters.
It’s suitable for serious recreational anglers and semi-professionals who need a comprehensive tool to locate fish and navigate waters effectively. Its networking capabilities allow for seamless integration with a wide range of marine electronics, making it a versatile choice for those with medium to large boats looking to invest in a high-quality fish finder.
Key Specifications:
| Transducer | Active Imaging 3-in-1 (CHIRP/DownScan/SideScan) |
| Sonar Frequencies | 83/200/455/800 kHz |
| Display | 9-inch high-resolution touchscreen |
| GPS | High-precision, built-in GPS/GLONASS receiver |
| Mapping | Preloaded C-MAP Contour+ |
| Max. Depth Range | 1,000 feet (305 meters) |
| Water Resistance | IPX7 |
| Price | $999 |
Here are the pros and cons of the Lowrance Elite FS 9:
Pros:
- 9-inch High-Resolution Display: Offers clear and detailed images.
- Multiple Sonars: Provides CHIRP, SideScan, and DownScan for comprehensive underwater views.
- Built-in GPS/GLONASS: High-precision navigation with preloaded C-MAP Contour+ maps.
- Wireless and Bluetooth Connectivity: Easy updates and smartphone integration.
- FishReveal Technology: Enhances the display of fish targets.
- Multiple Networking Options: Can network with other devices for a more integrated system.
Cons:
- Price Point: Expensive compared to basic models, potentially out of reach for budget-conscious anglers.
- Complexity: Advanced features may require a learning curve for new users.
- No Radar Integration: Unlike some other high-end models, it doesn’t support radar for navigation.
Display Quality
The Lowrance Elite FS 9 features a high-resolution 9-inch touchscreen display that is well-regarded for its clarity and detail.
The 9-inch screen provides ample space to view the sonar returns, maps, and other data without feeling cluttered, which is especially beneficial when you need to quickly glance at the finder to interpret the underwater environment. A larger screen also allows for better split-screen views, so you can simultaneously monitor different types of information, such as CHIRP sonar and DownScan imaging or maps and sonar, without sacrificing detail.
The touchscreen functionality on the Elite FS 9 enhances the user experience by making it easier and faster to navigate through menus, adjust settings, and pinpoint locations on the map. Touchscreens are particularly helpful when you need to zoom in on a map or quickly switch between different views. It’s designed to be responsive, which means you can use it even with wet hands, a common situation while fishing. However, in certain conditions, such as when there’s heavy rain or if you’re wearing thick gloves, the touchscreen might be less convenient than traditional button controls.
The benefits of a big screen and a touchscreen interface are most pronounced when fishing in areas where detail is critical. For instance, when you’re trying to follow contours and edges where fish are likely to be, or when you’re trying to distinguish between fish and structure, the high-resolution display can provide clearer images and better differentiation.
Sonar Performace
The Lowrance Elite FS 9 comes with the Active Imaging 3-in-1 transducer. This transducer provides three types of sonar:
1. CHIRP Sonar
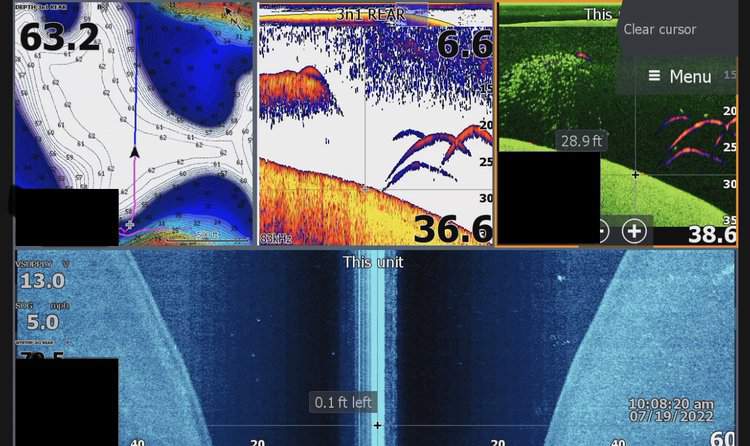
The image below displays the screen of a Lowrance Elite FS 9 showing the CHIRP Sonar readings. The fish finder is set to a general mode with an automatic depth range of 40 feet and uses a frequency of 200kHz, which is typical for high-resolution imaging in relatively shallow water.

The sonar returns are clear and there is a distinct contrast between different elements within the water column, which is indicative of a high-quality sonar system. The distinct arches demonstrate that the CHIRP sonar is effectively identifying fish with good target separation, and the detail on the bottom contour indicates that the unit is providing a detailed look at the bottom structure.
Moreover, the color differentiation is sharp, with different intensities readily apparent, which is crucial for anglers to determine bottom hardness and locate fish. The screen is also showing minimal surface clutter, suggesting that the unit’s noise rejection capabilities are functioning well.
In summary, the CHIRP sonar of the Elite FS 9 delivers detailed and useful information to the anglers, which is what you would expect from a modern fish finder in this class.
2. DownScan Imaging
When it comes to imaging, the Elite FS DownScan offers clarity at both 800 kHz and 455 kHz frequencies. At 800 kHz, you’ll get superior resolution images, making it easier to spot fish close to the bottom or around structures in shallow water. The 455 kHz frequency allows for deeper penetration, up to 300 feet, which is beneficial for identifying fish-holding areas in deeper water.
When fishing in shallow waters, the 800 kHz frequency setting on the DownScan gives you a very clear and detailed image of the underwater environment. This can be crucial for spotting species that prefer to stay close to the bottom or near structures, such as bass around submerged trees or crappie in and around weed beds.
For species that are structure-oriented, such as snapper or grouper, the DownScan fish finder can help you identify ledges, drop-offs, and reefs where these fish are likely to be found. By providing high-resolution images, you can pinpoint the exact locations of these structures and the fish that are holding to them.
3. SideScan Imaging
SideScan in Elite FS 9 offers detailed views up to 150 feet on each side of the boat at 800 kHz for high definition imagery in shallow water, and up to 300 feet with the 455 kHz setting for extensive side coverage in deeper water.

Using the 800 kHz frequency, Lowrance SideScan provides a high-resolution image of the underwater structure where species like bass, pike, or panfish might hide or feed. Anglers can see weed lines, submerged trees, rocks, and even individual fish, allowing for precise casting.
For fish that school in open water, like crappie or certain saltwater species, Elite FS 9 can help locate the schools off to the side of the boat, so you can position yourself for optimal casting or trolling without spooking the school by driving directly over them.
The 455 kHz frequency gives a broader, deeper view, which is great for identifying ledges, drop-offs, and other deep structures favored by species like catfish, walleye, or certain types of saltwater fish.
GPS and Mapping
The Elite FS 9 is equipped with advanced mapping features that significantly enhance the fishing and boating experience. The unit comes with preloaded high-detail C-MAP Contour+ inland and coastal charts, which offer a wealth of information such as depth contours, spot soundings, and navigational aids. This comprehensive mapping allows anglers to pinpoint the most promising fishing spots, such as drop-offs, channels, and potential structures where fish are likely to congregate.
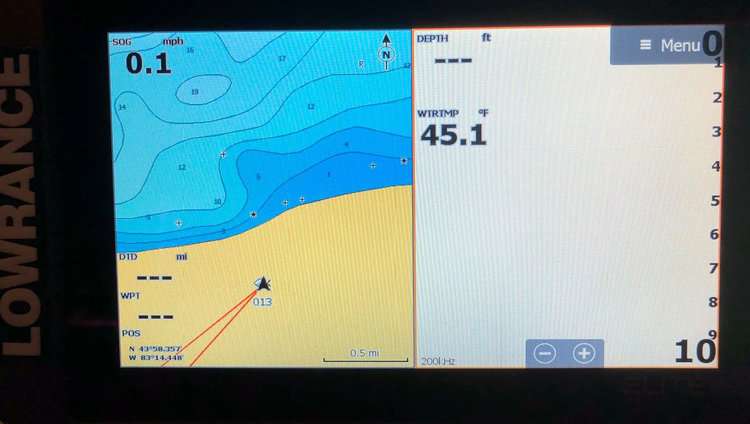
For boating, the mapping features assist in safe navigation, allowing boaters to avoid potential hazards and navigate through unfamiliar waters with greater confidence. The GPS functionality also allows for route planning, tracking, and saving waypoints, which simplifies the process of returning to successful fishing spots or navigating through frequently traveled routes.
The mapping tools, when combined with the sonar capabilities, transform the Elite FS 9 into a robust fish finder GPS combo for both successful fishing and safe, efficient boating.
Cost
The Lowrance Elite FS 9 is listed at $999 on the Lowrance website, which is often a good indicator of the base retail price. However, prices can vary between retailers and may fluctuate due to sales, promotions, or bundle offers that include additional accessories or transducers.
Here are some tips to find good deals on the Elite FS 9:
- Check Online Retailers: Look at websites like Amazon, Bass Pro Shops, Cabela’s, or Tackle Warehouse. They often have competitive pricing or exclusive online deals.
- Look for Sales Events: Major sales events like Black Friday, Cyber Monday, or holiday sales often offer significant discounts on electronics.
- Refurbished Units: Consider purchasing a factory-refurbished unit, which can be cheaper than new models while still offering a manufacturer’s warranty.
- Boating and Fishing Expos: Sometimes, manufacturers offer show specials during fishing and boating expos.
- Local Marine Dealers: Visit local marine electronics dealers. They might offer package deals, including installation or additional warranties.
FAQs
How to Install Lowrance Elite FS 9
Installing the Lowrance Elite FS 9 can be relatively straightforward, even for beginners, with some basic technical knowledge and the ability to follow the included installation instructions. Here’s a general overview of the process:
- Selecting the Location: Determine the best spot on your boat for the display unit. It should be easily visible and accessible without obstructing boat operation.
- Mounting the Display: Use the mounting bracket and hardware provided to secure the display unit. This typically involves drilling holes and screwing the bracket into place.
- Transducer Placement: The transducer should be mounted on the transom of the boat, in a location that’s in the water at all times, but away from motor turbulence and any potential obstructions.
- Running Cables: Route the transducer cable to the display unit, avoiding areas where it could get pinched or damaged.
- Power Connection: The Elite FS 9 needs to be connected to a 12V power source. You will have to connect the power cable to the boat’s battery or electrical system, ensuring that it’s fused properly.
- Testing: Once everything is installed, test the unit in the water to ensure that the transducer is correctly positioned and that all functions are working properly.
How to Use Lowrance Elite FS 9
Here is how to use Lowrance Elite FS 9 effectively:
- Power On: Turn on the unit by pressing the power button. Wait for the system to boot up.
- Initial Setup: The first time you power on, you may go through an initial setup wizard where you can set language, units (metric or imperial), and other basic settings.
- Understanding the Home Screen: Familiarize yourself with the home screen where you access all the features like sonar, chart, settings, etc.
- Sonar Operation: Select the sonar mode from the home screen. You can choose between CHIRP, DownScan, or SideScan depending on your needs. Adjust the range and sensitivity as required for the water depth and clarity.
- Interpreting Sonar Returns: Learn to interpret the sonar returns, identifying fish arches, structure, and bottom composition. Use zoom and frequency adjustments for a better view.
- GPS and Charting: Use the chart plotter to view your location. You can mark waypoints, create routes, and track your path. The GPS feature also helps in marking fishing spots.
- Mapping Features: Utilize the mapping features to understand the underwater topography. With Genesis Live, you can create or update maps of your fishing spots in real-time.
- Menu Navigation: Use the touchscreen to navigate through the menus for more detailed settings adjustments, like setting alarms for fish or shallow water, changing display options, and customizing overlays.
- Software Updates: Regularly check for software updates that can be downloaded from the Lowrance website to ensure your device has the latest features and improvements.
- Practice: Spend time on the water using the device. The more you use it, the more intuitive finding fish and navigating will become.
What is the best battery for the Lowrance Elite FS 9
The best battery for the Lowrance Elite FS 9, or any similar high-end fish finder, is typically a 12-volt deep-cycle marine battery. Here are the key features to consider:
- Capacity: Look for a battery with enough amp-hours (Ah) to power your device for the duration of your trip. A capacity of around 35 Ah should suffice for a full day’s use, but this can vary based on your specific usage patterns.
- Type: AGM (Absorbed Glass Mat) batteries are a popular choice due to their maintenance-free nature and reliability. Lithium-ion batteries are also an excellent, though more expensive, option due to their lighter weight and longer lifespan.
- Durability: Marine batteries are designed to withstand the vibrations and rough conditions encountered on a boat. Ensure the battery you choose is rugged and durable.
- Size and Weight: Make sure the battery fits in the designated space on your boat and that you can handle its weight comfortably.
- Rechargeable: A rechargeable battery with a low self-discharge rate will serve you better in the long term.